INTRODUCTION

Following is a very basic outline on beginning features a person could use to gain the basic understanding of AutoCAD. The enclosed instructions encompass Releases 9 through 14, except where noted.
Some items discussed in this section should be set up by the AutoCAD administrator or AutoCAD manager, and
should not have to be modified often (if at all) by the end user. Once the setup is
complete, the (otherwise empty) drawing is saved, along with most settings, with a particular name and used as a prototype
for new drawings from then on. Several of these prototype drawings can be saved if
different layouts and setups are to be utilized. For example, you could setup one prototype with an
8-1/2 x 11" border and one with a 11 x 17" border. Some of the least used settings are listed and
described below and, as mentioned, will probably be set up by the AutoCAD
Administrator. Some other pertinent settings will be discussed as they become necessary.
COMMAND LINE
- When entering commands, they are entered in what is called the command line. This is almost always located at the bottom of the screen. In addition, commands entered on the command line are not case sensitive. That means that LINE is the same as line.
- Pay close attention to the command line. Some commands will move progressively along, while other will wait for you to press the enter key. The latter usually consists of two part commands, such as when you must first make a selection set, press enter, and then select the objects you wish to act upon.
- All commands are referred to from the command line. In almost every case, there is a pulldown menu, sidebar menu, tablet, or shortcut key equivalent. For example, in the Windows environment, instead of typing SAVE to save your work, you could use the FILE pulldown and select SAVE from there.
ENTER KEY
When the command line is empty (i.e., it is waiting for a command to be issued and simply states: Command: ), pressing the enter key will repeat the last command.
SPACEBAR
The space bar in AutoCAD constitutes the same keystroke as the enter key
in almost every situation. The only notable exception to this is when entering text with
any of the text commands. Also notable is that in some releases of AutoCAD, the space
bar sometimes appears to do nothing at all, when in fact it is putting a blank space in the command line.
FUNCTION KEYS
Throughout the releases of newer revisions of AutoCAD, the Function keys have basically remained the same. The most commonly used are shown below and are all On and Off toggles.
F6 / Coords - Provides coordinate information on the status bar
F7 / Grid - Displays (dotted) grid with current grid settings
F8 / Ortho - Lines are drawn at, or restricted to, 90 degree angles
F9 / Snap - Snaps to grid whether grid is displayed or not
In DOS based releases of AutoCAD, F1 switched back and forth between your graphic and text screens. In Windows based releases, F1 calls up the Help file, and F2 switches back and forth between your graphic and text screens (unless otherwise modified).
COMMAND LINE OPTIONS
- If you are given multiple options on the command line, usually the options can be accessed by typing in the letter of the option that is capitalized in the option list.
Example: (Color/Elev/LAyer/LType/ltScale/Thickness)
In this example, typing C would select the Color option.
Typing E would select the Elev option.
Typing LA would select the LAyer option, etc.
- When a command returns some options on the command line, the majority of time it will supply a default option by using brackets <>.
Example: Normal/ON/OFF <OFF>:
Pressing enter in this example would act as if you had typed in OFF yourself.
SETTINGS
DDUNITS
... Setting is saved with drawing.
Units should be setup before any new drawing is created. Once a drawing is saved
however, whenever that particular drawing is retrieved, the units will remain as they
were when saved. Units are accessed by typing in 'ddunits' at the command prompt.
All angles are by default as they are on a protractor. That is, the angles range from 0 to
359, counterclockwise. The inch sign (") is not needed as everything defaults to a unit of one, whatever that one may be composed of.
If using Architectural units, .25 would be a quarter of an inch (.25 of 12).
10'2-1/4"
10'2-1/4
10'2.25
122-1/4
122.25
10'-2-1/4 or 10'-2-1/4" will not work and 10'21/4 would be 10 feet 21 fourths of an inch.
In Engineering, .2 would be 2/10ths of an inch (.2 of 10).
10'-2.2"
10'2.2"
10'-2.2
10'2.2
102.2
If you get an error when typing in units, one of the causes could be that you are trying to insert one type of unit while another is active. That is to say that if DDUNITS is setup to receive decimal units, it may not accept architectural units. However, some units are (somewhat) interchangeable such as architectural and engineering.
Keep in mind though that architectural is in the form of 12ths, while engineering is in 10ths. Therefore, even though AutoCAD will accept these two units interchangeably, it is factoring them differently.
REGENAUTO
... Setting is saved with drawing.
This setting will determine whether the screen will be regenerated automatically, or if it needs to be confirmed before doing so.
REGEN - A regen is when all the 'visible' objects in the drawing are completely redrawn. This is a very tedious task for the computer, and can take a little bit of time on larger drawings.
REDRAW - A redraw is when all the visible objects in the drawing are refreshed on the screen only. Being that the objects are only refreshed and are not completely redrawn, this does not take nearly as long to perform.
Note: This reference to 'visible' objects is not entirely true. However, for the sake of clarity, in the name of simplicity, and to get the basic point across, it is only technically inappropriate. However, for a better understanding of 'visibility', please refer to the Layer section below.
BLIPMODE
... Setting is saved with drawing.
When clicking on the screen (in the drawing area), whether picking points or selecting objects, blipmode, if
turned on, will leave miniature white blips on the screen until such time as the screen is
redrawn, regenerated, zoomed or panned. Type in 'blipmode' and set it to either '1' for
on or '0' for off.
UCSICON
... Setting is saved with drawing.
This is a navigational tool that helps in orientation of a drawing, but is mostly used for 3-D work. This setting is controlled similar to blipmode. Type in 'ucsicon' and set it to
either 'ON' for on or 'OFF' for off.
VIEWRES
... Setting is saved with drawing.
Keeps circles and arcs looking like circles and arcs. The higher the number, the less
faceted items such as these will look. Fastzoom should be set to 'Y'es, and the correlating number
to somewhere between 5,000 and 20,000. Slower video cards should use closer to
5,000, and perhaps even as low as 1,000.
CMDECHO
... Setting is not saved with drawing.
If on, each command given will repeat itself. This is usually very annoying and should
be turned off. It does help sometimes however in troubleshooting AutoLISP routines.
THE BASICS
DRAWING LINES
There are 3 basic methods to drawing a line. Each has it's own individual advantages,
depending on the situation.
The command to begin drawing lines is:
You will be prompted in the command line area with:
This is where you have your options as to how you enter your points, which are listed below.
Pointing
This method can be used as a free-form method of 'sketching', or it can be used in
conjunction with Object Snaps for more accurate drawing. Object Snaps are discussed
in a later section.
Coordinates
Specific X, Y (and Z) coordinates may be typed in when asked to pick a point.
Please refer to the units section above for information on how units are used.
Distance/Direction
Polar coordinates may also be used and would be used more for drawing the line than
for starting the line. In this case you will specify a distance and an angle for the line to
be drawn in. The @ sign is used to designate the distance and the < sign is used to
designate the direction angle. Again, please bear in mind how units are entered according to the units section above.
TIPS/TRICKS
Closing a line
A quick way to finish up a line is to type a C (which stands for Close) when asked for the next point. This will
draw a line from the current point, back to the point the line was first created (i.e., the
first point picked the last time the line command was issued). This means that even if
you hit enter twice to continue a line, it will only go back to where the line was actually
started from, not the start of the continued line.
Coordinate Filters
In it's simplest form, if asked for an X and Y coordinate, you can filter out one of these
by using another object's coordinate. Basically, you could type in .X (a period, then an X), select an object
who's X coordinate you would like to use, then type in or pick your corresponding Y value.
The same can be used with X, Y, and Z coordinates.
DRAWING POLYLINES
Polylines are nothing more than a lot of lines connected together as one object (entity).
This group of lines and/or arcs can be manipulated all at one time by selecting
anywhere on the polyline itself. It can be moved, copied, or offset just as a normal line
would be. It can also be given unique widths and shaped into curves (such as Beziers).
Using the explode command on a polyline will turn it into individual lines and arcs. It will
also remove any width the polyline may have had.
TIPS/TRICKS
Closing a polyline
Polylines can be closed just as a line can by using the letter 'C' when asked for the next point.
Editing polyline attributes
There are two methods to editing polyline attributes; command line or the properties box. Some attributes are only available on one or the other, such as editing individual segment widths (available via command line).
NOTE:
- Polylines, by default, are 2D, which means all segments of a polyline are coplanar (on the same plane). 3D polylines can be coplanar or non-coplanar.
DRAWING CIRCLES and ARCS
Circles
Options to creating a circle are, 3P (3 point), 2P (2 point), TTR (tangent-tangent-radius),
or starting it right off by selecting a center point. The easiest method is to select a
center point by pointing on the screen or using Object Snaps (next section). Once you
have chosen your center point, you then have the option of determining the circle's
width by telling it the 'D'iameter or radius of the circle (the default is radius). Using
either method, you can chose the width by either freely picking it on the screen (or
using Object Snaps), or by typing in the diameter or radius onto the command line.
Arcs
Arcs are similar to circles, however, there are a lot more options as to how they are
created. For the sake of simplicity, we will stick with the default method. It will ask you
for either a 'C'enter or start point. If selecting a start point, you can then enter a second
point, followed by the end point. If selecting the 'C' method (for Center), you will input
or pick your center point (center of arc as if it were a circle), select the start of the arc,
and then the end of the arc. There are far too many methods to cover in a simple
instructional such as this. Further help can be found in either the manuals, or by typing
help at the command prompt, followed by the keyword arc.
OBJECT SELECTION
- Selecting Individual and/or Multiple Objects
Whether creating or modifying objects within a drawing, you will constantly
look to objects that are already drawn to assist you in your tasks.
The following should help you to get a hold of these objects. When in selection mode, the command prompt will show: Select objects: .
Individual Selection
You can select objects on an individual basis by putting the little box (supplied when
required) on top of an object and pressing the pick button (also known as button number one). It's that easy.
Multiple Selections
Two of the (most common) ways to select objects is by drawing a box around them.
Window
You can start selecting multiple objects in using a Window box by typing a W when in selection mode. This mode will select any object that is 'completely' within the drawn window.
Once selected, you will re-enter individual selection mode.
Crossing
Typing a C when in selection mode will provide you with the ability to make a selection by using a Crossing window. This will not only select any object that is 'completely' within the drawn window, but will also
select any object that is hanging out of the window (i.e., crossing through the window
lines).
Object Deselection
Holding down the shift key while making a selection in either of the previous two methods will deselect the selected objects. Alternatively, while in selection mode, you can type in an R (which puts you in Remove mode), which will allow you to deselect objects in the exact same manner as selecting them. Typing in an A will put you back into the original Add mode.
TIPS / TRICKS / NOTES
- In Window mode, the boxed window will be solid. In Crossing mode, the boxed window will be dashed.
- There are additional methods for selecting objects which can be found on the command
line. These are revealed by typing in a ? while in selection mode. Three additional very commonly used selection sets are [P]revious, [L]ast, and [A]ll.
- In newer releases, there is what is called an implied selection. This means that there is no reason to press C or W to select by windowing. Picking a point in the drawing area without selecting an object will begin a windowed selection. If you drag the cursor to the right, you will be in Window mode. If you drag to the left, you will be selecting in Crossing mode.
- Also in newer releases, there is an additional selection mode named Fence. This is used similarly as the Crossing method, only instead of windowing the selection, a continuous line (similar to that of a polyline) is drawn. Everything crossing over that line is then selected.
- You will find that zooming in on the section that you will be working with will help in
making certain selections.
OBJECT SNAPS
- Snapping to Lines and Other Objects
One of the most important factors in drawing and modeling is the use of object snaps.
This is also one of the key features to AutoCAD's precision.
The following five items are the most commonly used object snaps.
Once you understand the concepts behind these basic object snaps, you will be able to gain an understanding of the remaining object snaps relatively easy.
Objects snaps are activated by typing in the appropriate object snap while in the drawing or pointing mode.
When using object snaps, a box, similar to that of a selection set box, is displayed.
Endpoint
- Type "end"
Snaps to the end of a line.
You need not position the cursor directly on the end of a line or arc for the cursor to snap to the precise endpoint of that line or arc.
You need only position the cursor to one side of the midpoint of the line or arc in question.
Polylines are treated as individual line segments, which means that a polyline can have many endpoints.
Midpoint
- Type "mid"
Snaps to the precise center of a line.
You may pick anywhere on the line or arc (including the endpoints), and the cursor will snap to the midpoint of said line or arc.
Again, polylines can have many midpoints.
Center
- Type "cen"
Snaps to the center of a circle or arc (not the midpoint, but the center of its radius or diameter).
A line has no center, but a polyline may, if it contains an arc.
Intersection
- Type "int"
Snaps to the intersection of two objects (i.e., where two lines cross).
Perpendicular
- Type "per"
Snaps perpendicular to a line or polyline (90 degrees against the grain).
NOTE:
- In newer releases, there is what is called a running object snap. When set, these object snaps will take effect whenever an object is in proximity to the cursor when picking a point. You may need to be careful as when these object snaps are in effect, the object snap box does not appear.
- However, if you type in an object snap from the command line (or in any other way), that particular object snap will be the only one active (i.e., running object snaps will no longer be active for that particular pick).
- In even newer releases, you are given the option to have a box displayed which will let you know which running object snaps are being referred to. When active, you can scroll through your running object snaps by leaving the cursor still, and pressing the tab key.
TRANSPARENT COMMANDS
A transparent command is one that may be invoked while in the process of another
command. Once the transparent command is completed, the original command
continues where it left off.
Some commands are already considered transparent when invoked. Alternatively, if you type in the command, preceding it with an hypostrophy ( ' ) will make the command transparent if it is allowed to be.
Example:
Drawing line, Zoom in, continue Drawing line
Example Commands:
Line (pick a point)
'Zoom
W (for window)
The line command will continue once you have zoomed in on your window.
A transparent command cannot be invoked if it requires a regeneration of the drawing. In newer releases, there are a LOT more transparent commands than in earlier releases. This is partly due to the fact that there are fewer times a regeneration is necessary.
LIMITS
Setting the limits in your drawing has two basic uses or reasons. You set limits by issuing the command: LIMITS from the command line. You then tell the rectangular area of your limits by selecting the lower left and upper right portions of the drawing you would like your limits set to. If you display the grid, you will notice that the grid is constrained within your limits. The limits, once set, are saved with each drawing.
- Zooming: Although zooming is discussed later, you should be aware that, in later releases, there is a command for zooming 'Limits'. This will zoom the drawing to the preset limits that you have established. For previous releases (and still an option with newer releases), the Zoom All was used, which would zoom to either the extents of the drawing, or the limits of the drawing, whichever was greater.
- Printing: When printing, you are asked which portion of the drawing you wish to print. One of these options is Limits. It should be noted that in earlier releases, this method of printing was not foolproof.
NOTE on Limits: New drawings have limits that are already setup. These are usually set within the prototype drawing, or in a drawing called "acad.dwg" (usually found in your AutoCAD program directory).
NOTE on Grids: Grids can be used as a visual aid while working on a drawing and are more commonly used in conjunction with snaps (which snap to the grid). There are three basic possibilities for not being able to see your grid.
- You are zoomed outside of where your limits are set.
- Your grid spacing is spaced too far apart.
- Your grid spacing is spaced too close together, which will give you a message stating "Grid too dense to display".
NOTE on Setup: LIMCHECK governs whether or not you are allowed to work outside of your limits. If on, and you try drawing outside your limits, you will receive an error ("**Outside limits"), but your command will continue as normal. You can turn LIMCHECK on or off by typing in LIMCHECK on the command line.
LAYERS
The following is a general synopsis of layering in AutoCAD. Layers give you control over your object and drawing in quite a few ways. Layers let you control the visibility, color, and linetypes (if applicable) of your objects on a more global basis. The command to enter the layering dialog box is:
- Older Releases: DDLMODES
- Newer Releases: LAYER
When drawing in AutoCAD, objects are drawn, by default, on a layer called "0" (zero). When beginning a new drawing, Layer "0" is the only layer in the drawing, which also means that it is the current layer. This layer cannot be deleted at any time from any drawing (it's there to stay).
Creating a (new) layer:
- Older Releases: Type in a name in the box at the bottom of the dialog box and press the button NEW right above it.
- Newer Releases: Select the NEW button and type in a name (which will be appearing on the left).
The current layer is the layer you will be working on. Only one layer can be current. To make a layer current, select the layer and press the current button.
Color and Linetypes
As you should see, you can also change the color and linetypes of the layers from this box. Once a color or linetype is changed, all objects on that layer will reflect the color or linetype that you have chosen.
NOTE: This is only the case if an object's color or linetype is not controlled manually (or independently). Manual overrides should be done infrequently and are therefore not discussed here.
Object Visibility
A layer's visibility is governed by its Frozen/Thawed or On/Off states. Making a layer Frozen or turning it Off will render the objects on that layer invisible. Likewise, making a layer Thawed or On will make the objects visible again. The differences between the two are as follows:
NOTE: As in all other programs, pressing the cancel button in the dialog box will void any changes you had made during that session of the dialog box.
Changing an Object's Layer
If you have drawn objects on one layer, but would rather them be on another layer, all you must do is to change that object's layer. This is done with the Change command. Type CHANGE on the command line, select your object(s) (pressing enter when finished selecting), Type P for Properties, and then type LA for Layer. Type in the name of the layer you want your object(s) to be on, and press enter twice.
NOTE: In newer releases, you may issue the ddchprop command, which will let you select your new layer from a list of all the layers in your drawing.
ZOOMING
Getting around your drawing is a nice feature that many software packages let you do:
Some do this better than others. AutoCAD is one of the former, enabling you to zoom
virtually any place in your drawing you wish (usually without interrupting your current
command or thought).
You enter the Zoom command by typing Zoom at the command prompt.
Pan
- Command is: PAN
Allows you to slide your view, thus moving parts of the drawing that are off the screen
into the active viewing area, and visa versa.
Window
- Command is: ZOOM W
Will let you draw a box that will represent your new view. If the box is not exactly the
vertical to horizontal ratio as your display, it will add extra space either to the right or up
to make the new view fit on the screen.
Previous
- Command is: ZOOM P
Zooms to the last view you had before your current zoom factor.
Extents
- Command is: ZOOM E
This zoom will fit all visible drawn objects on the screen. It will fit them vertically with
some horizontal space left over, or visa versa. Items on layers that are turned off (as
opposed to frozen) are considered active.
TIPS/TRICKS
Zoom Extents is very useful if you get lost by zooming in too far.
Limits
- In newer releases
Command is only accessed from the toolbar and looks like 
To zoom limits, it is preferred that you first have your limits setup. This will zoom the drawing to the preset limits that you have established.
For previous releases (and still an option with newer releases), the Zoom All was used, which would zoom to either the extents of the drawing, or the limits of the drawing, whichever was greater.
Vmax
- Introduced in newer releases
You can only zoom in or out so far before the computer will need to 'regen'erate your
drawing. If the
computer requires a regen, you cannot perform a transparent zoom. Vmax will let you
zoom out as far as possible without the need of a regen.
NOTE: In the very latest releases, Vmax does not appear in the Zoom prompt, but it can still be accessed by typing a (Zoom) V.
TIPS/TRICKS
Zoom Vmax is very useful at the beginning of a newly created drawing or on very large drawings that
take time to regen.
ORTHOMODE
This is a toggle which controls the direction of cursor movement.
On
Lines are drawn at, or restricted to, 90 degree angles.
Off
Movement is in free-form mode in which any angle can be reached.
TIPS/TRICKS
This is a transparent command when issued using the F8 key
MOVE/COPY
- Command is: MOVE or COPY
These commands will move or copy an object (or objects) from one location to another.You will first be asked
for a base point, this is similar to the start point of a line. The next point would be where the object will end up.
Just as in drawing a line, there are 3 basic methods to moving/copying object(s). Each
has it's own individual advantages, depending on the situation. Please see the section Drawing Lines section for more information.
Copy Multiple
You may also invoke the 'M'ultiple option when copying to create many copies of selected object(s) at
the same time, without having to go back and repeat the command and re-select
your object(s).
When the command Copy is issued, type an M to go into Copy Multiple mode.
OFFSET
- Command is: OFFSET
This command will copy an entity to one side or another of selected object.
A distance may be given (typed in) for how far away the
object will be offset (copied). After issuing the Offset command, type in a number which represents how far away the object is to be copied from its original. Select the object to be offset, and select the side you want the copy to end up on.
Alternatively, you may use the 'T'hrough option to pick your offset distance on
the screen. To use the Through option, after issuing the Offset command, type the letter T (or press enter). You will be asked to select the object, and then to pick the point where you would like the copied object to end up.
A few objects that can be offset are lines, circles, arcs, and Polylines.
USE and LIMITATIONS
Only one object may be offset at a time.
Example: A circle can be offset 1 inch to either the inside of the circle (if there is room)
or the outside of the circle. Either way, you will create a donut.
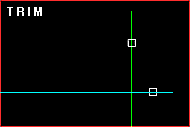
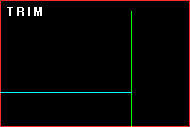
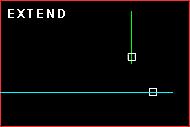
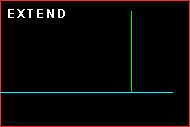
TRIM/EXTEND
These two are flip sides of a coin. If
you have multiple lines, arcs, circles, or Polylines that need modification, trimming or
extending them is the answer.
For individual arcs or lines, you may prefer to use fillet (described next).
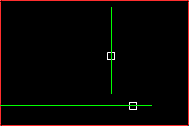
Trim
- Command is: TRIM
If a line goes past another line, you can trim the line that is hanging over, using the
other line as the boundary.
First select your boundary (or cutting edge), and then select the line to be trimmed - making sure to select on the side you want to remove.
In the example below, to trim the cyan line on the right, you first select the boundary - the green line (anywhere), and then select the cyan line on the right side of the green line.
 .
. 
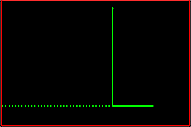
Extend
- Command is: EXTEND
If a line stops short of another entity, you can use extend to make it grow until it touches
the entity you chose as its boundary.
In the example below, to extend the green line to meet the cyan line, you first select the boundary - the cyan line (anywhere), and then select the green line on the side of the line that is closest to the boundary. If you select the top portion of the green line, you will get the response: "Object does not intersect an edge."
 .
. 
USE and LIMITATIONS
A circle cannot be extended. It also cannot be trimmed if only one other
item is selected as a boundary, unless that other item passes through the circle at least twice.
NOTES:
In the very latest releases of AutoCAD, you can use an implied boundary. That is, even if the object to be trimmed or extended does or will not actually meet the other line, the other line can be calculated as though it actually did continue. For Trim, using the first Extend image above, the cyan line can be trimmed at a place where the green line 'would' join if the green line were extended. In older releases, you would have to draw a temporary line from the end of the green to the cyan, make the trim, and then erase your temporary line.
FILLET - (fill'-et, not fill-aye')
- Command is: FILLET
The fillet command will take two lines or arcs and join them together by extending or
cutting both lines so that both end meet.
This is basically a trim and extend routine all in one.
Individual Selection
When filleting, you are initially placed in the individual selection mode. That is, you select one object, and then the next object, and they are filleted.
If objects don't overlap, it doesn't matter where, on the line or arc, you select.
If one or both of the object's paths does overlap, it does matter which side of the object you select (in reference to where the other object would or does pass through the selected object). The position of the selection will be the side of the object that remains.
In this example, the dotted line in the right image would be eliminated, and the line above it would be extended to meet the horizontal line.
 .
. 
Multiple Selection
If you type a C at the first select object prompt, you can select your objects using a Crossing method. When you draw your Crossing window over two objects, they are filleted.
When selecting using the crossing method, the largest side of the line or arc dominates and will remain.
In the above example, the left side of the bottom line would be the portion to remain.
NOTES:
- If there are more than two objects in the Crossing window, the program will make the two object selection for you.
- If one of your selections is not able to be filleted, the program will let you know.
Fillet Radius
If you would like rounded
corners when you fillet, you may use the 'R'adius option to provide the radius you would like to give the
corner. At the first select object prompt, type R, enter a radius dimension. Once the dimension in input, the command will exit. Press enter again to re-enter the Fillet command.
Use & Limitations
You may only fillet two lines or arcs per command.
Parallel lines that are filleted will produce a half-circle at the end of the two lines nearest the end of the first pick.
Filleted polylines are filleted and joined, provided they are not of the same polyline.
DRAWING LAYOUT TIP
The following procedure can be used to better prepare your drawings for working, and moreover, for printing.
- Begin an empty drawing.
- Draw a rectangular box the size of your paper (i.e., 8-1/2 by 11 inches) with the lower left of your box being set to 0,0.
- Set your limits to the lower left and upper right corners of the rectangle.
- Print the page using limits in your Additional Parameters. Check to make sure your scale is set to 1=1 and that your Rotation and Origins are correct. Performing a print preview will show that the upper and right sides of the drawing will be cut off. This is to be expected.
- When the page prints out, measure the distance from the left edge of the paper to the left side line. Offset the left line in the drawing that same distance. This is your left margin.
- Measure from the bottom of the page to the bottom line. Offset the bottom line this distance. This is your bottom margin. Fillet these two inside lines.
- Measure from the right side of the paper to where the bottom line cuts off in the lower right of the page. Offset your right line this distance.
- Measure from the top of the paper to where the left line cuts off in the upper left of the page. Offset your top line this distance.
- Fillet the remaining inside lines. You can, at this time, connect all inside and outside lines into polylines for easier control.
- You should place the outside line on a layer of its own (i.e., "outside") and the inside line on a layer of its own (i.e., "inside"). This will enable you to turn off the outside line and use the inside line as a border.
- You should then save this drawing with a block-type name
For example:
"8x11p.dwg" for 8-1/2 by 11 inch Portrait frame, or
"8x11l.dwg" for an 8-1/2 by 11 inch Landscape frame
The inside line is your workspace. You should now set your limits to the lower left and upper right of this rectangle. You should not work outside of this area.
For drawings of a different scale factor, you can then insert your frame into your current drawing (in either Paper or Model Space), at a scale you will want your drawing to be (i.e., an insertion factor of 48 would represent 1/4"=1'-0").
This is also very useful in large drawings to print out little parts of the drawing at the original scale.
OPENING and SAVING DRAWINGS
Opening - If a drawing is already opened and has been modified, you will be prompted to save it. Otherwise, you will be given a dialog box in which you can search for the file you wish to open.
Saving - You can save a drawing by typing SAVE at the command prompt. Enter a file name where prompted. If you modify a drawing, you will be asked if you would like to save the drawing the next time you try to open a drawing, begin a new drawing, or exit the program. If you answer yes, you would also simply supply a filename where prompted.
Exiting - With newer versions, typing QUIT at the command prompt will give you the option to save and exit or not save and exit. Simply answer Yes or No to the "Save changes to drawing?" prompt. Please note that this question is only asked if a change has been made to the current drawing session.
NOTES:
- Older releases were a bit more obscure, and would require too much documentation at this point.
- This does not cover file naming conventions or directory/folder organization. AutoCAD follows the standard procedures for the operating system in which you are working.
CONCLUSION
As mentioned, this does not cover all the basics. It is merely intended for someone to get their "foot in the door".
